Microsoft has always given powerful capabilities to its users to work efficiently.
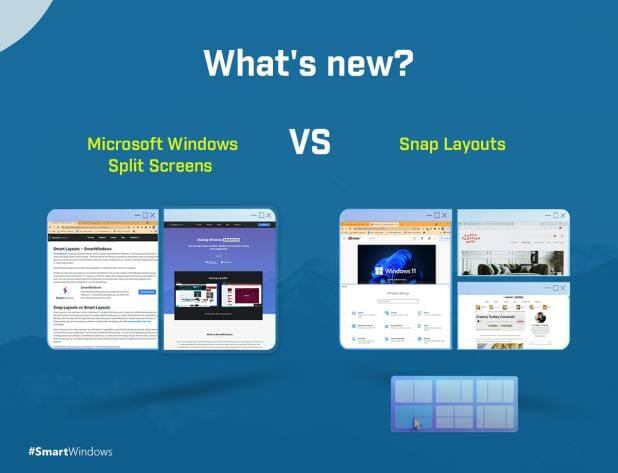
Split-screen in Windows 10 and Snap Layouts in Windows 11 have always served the purpose of maximizing productivity. These features enable the user to work on many apps simultaneously without switching between them back and forth in the taskbar. You can arrange apps on your desktop screen in such a way that access to more than one app could become easy. For example, by splitting screens, you can research and write at the same time.
Split Screen
With Split Screen in Windows 10, you can divide your screen from two to more portions based on your work preferences and the number of apps you are working on.
How to Split Screen on Windows 10 using ‘Snap Assist’?
Follow the steps below to split screen on Windows 10.
- Go to Settings, click on System.
- Select Multitasking from the list.
- From Snap options on the right side, turn on the sliders. This will enable the Snap features on Windows 10.
- Choose one option from all available options of ‘Snap Assist’.
- Arrange the windows of all the apps you are working on and drag them accordingly.
You can also open and arrange the apps manually on your computer screen.
- Open the apps you are working on.
- Resize the window size of each app and adjust its position on the screen.
- You can open more than two apps based on your work needs.
- Arrange the apps in such a way that you could work on them efficiently.
Both ways help you save time and work in a highly organized manner in Windows 10.
Snap Layouts
Windows 11 has introduced an intuitive feature of ‘Snap Layouts’ and ‘Snap Groups’. Windows users can use these features to maximize productivity and multitask in a much more efficient way. Snap Layouts provide you with a clutter-free screen for a particular work zone. A visually clean interface makes it easy for you to work on multiple desktop apps at the same time. It also ensures a streamlined workflow.
Snap Layouts has 4-6 layout options depending on the screen resolution and size. For standard and ultra-wide screens, four and six layout options are available respectively. The users can select the one that best meets their work needs.
The six grid options of Snap Layouts include:
- 50/50 split for two windows
- 70/30 split for two windows
- Three windows split equally
- 50/25/25 split for three windows
- 25/25/25/25 split for four windows
- 25/50/25 split for three windows
How to use Snap Layouts in Windows 11?
Follow the steps below to use Snap Layouts.
- Hover the mouse on the maximize button on the app’s window.
- You will be able to see available layout options.
- Select the one according to your choice.
- Choose apps and fill the slots to snap windows.
Snap Layouts enable an organized way to work and multitask.
Split-Screen & Snap Layouts – How Smart Layouts Boost Both?
Smart Layouts by SmartWindows empower the use of Split-screen and Snap Layouts in Windows 10 and 11 by giving them the capability to get auto-arranged on one or many screens with a single click.
Smart Layouts help Windows users to maximize work productivity by eliminating the overhead of arranging apps on the screen every time before getting started to work. Use Split-screen and Snap Layouts to set your work zones, study profiles, or entertainment presets. SmartWindows can be used to save the screen configuration. You can auto-restore the screen setting with one click whenever you need.
SmartWindows helps Windows users:
- Auto-arrange the desktop apps at exactly the same display position with the saved window size
- Create unlimited profiles and multiple displays
- Restore the browser tabs and windows on one or multiple screens
- Auto-arrange the MS Office files
- Auto-restore the Split-screen and Snap Layouts
Make Windows more powerful with SmartWindows!


