Setting up your computer screens can be easy for some people, but hard for others who don’t know much about technology. It might feel confusing to use the new Windows Settings app from Microsoft.
The Settings app serves as a modernized alternative to the Control Panel. It has many features in the same places as the previous operating system. Setting up multiple monitors is easy and quick once you know where to go. This includes deciding which monitor to designate as your primary display. Would you like to change the monitor that is currently in use? In this article, we’ll tell you how to change primary monitor in windows 11. So, let’s get started!
Set Up Your Dual Monitors
When multitasking or tackling complex tasks on your computer, having multiple monitors can boost productivity. While setting up dual monitors is a simple task, there are a few things you should consider before you begin.
First, you need to check if your computer can support dual monitors. Here are the steps:
- Open the Settings menu on your Windows computer.
- Navigate to the “System” section.
- Click on “Display” from the options listed on the left sidebar.
- Move the cursor down and find the “Multiple Displays” option. If this option is present, your computer is equipped with dual monitors.
- Once you’ve confirmed your computer’s dual-monitor capabilities, the next step is to assess the hardware prerequisites.
Older computers might need a VGA cable and an HDMI to VGA converter to facilitate the connection. Conversely, modern computers typically require just an HDMI cable. In either case, you’ll also need to acquire an external monitor to function as your secondary display.
Make sure to use the correct cable to connect your computer and monitor. Check your computer’s video output ports and securely attach the cable to your monitor and computer. Finally, choose a display configuration that meets your requirements.
Selecting Your Display Arrangement
After successfully connecting your additional monitor, the next step is to determine how you’d like to manage and showcase your content. Follow these steps to access the projection menu using the Windows + P keyboard command. You’ll find four distinct options to choose from:
PC Screen Only
This serves as the default setting. It directs all content exclusively to the primary monitor, leaving the secondary monitor dormant and unutilized.
Duplicate
Opting for this mode results in both the primary and secondary monitors displaying identical content. This configuration is especially practical when the secondary monitor is larger and aims to replicate the primary monitor’s output.
Extend
Use the second monitor to expand your workspace. Widely adopted due to its versatility, the primary and secondary monitors can exhibit different content, making it an excellent choice for multitasking.
Second Screen Only
Here, the secondary monitor takes center stage, exhibiting all content while the primary monitor remains inactive.
Determining Your Primary Monitor
It’s important to establish which monitor holds the status of being the primary display. The initial display device linked to your computer assumes this role by default. The built-in screen is inherently the primary monitor for laptops, while any external monitors are considered secondary.
To pinpoint the primary monitor, adhere to these steps:
- Launch the Settings menu on your Windows computer.
- Access the “System” section.
- Choose the “Display” option.
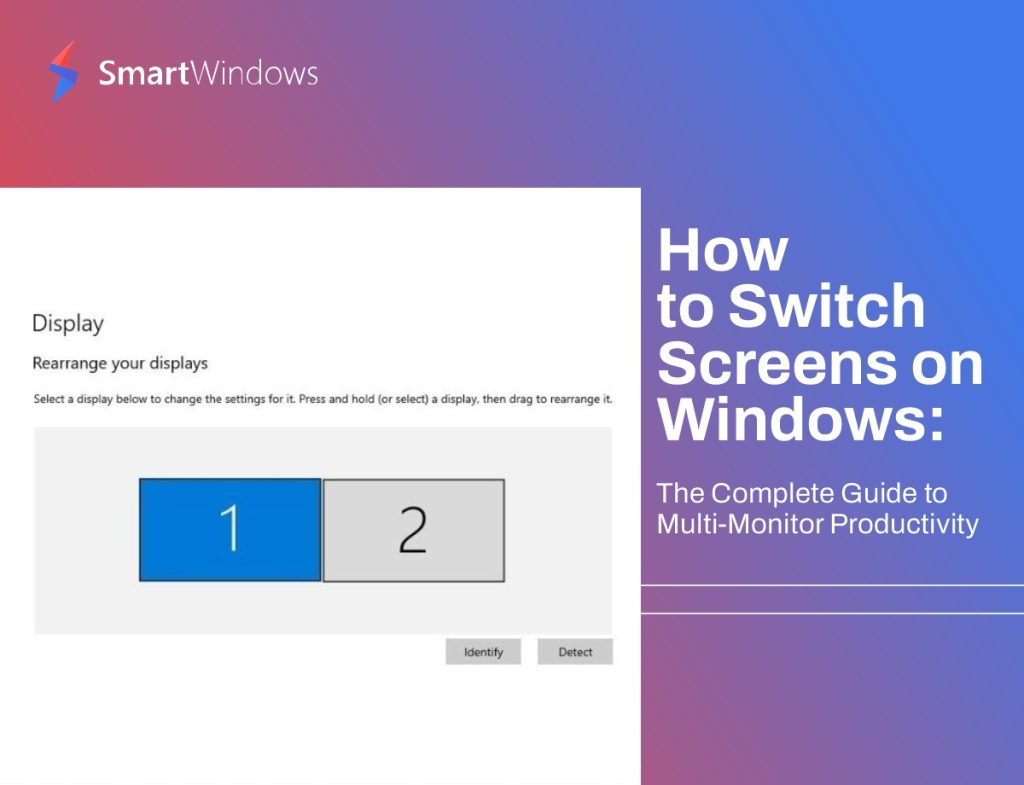
- In the case of Windows 11, click on “Identify” to assign a numerical label to each screen.
- The monitor designated with the number 1 at the center is unequivocally the primary monitor. As you progress numerically, the second monitor assumes the number 2, while a third monitor claims the number 3.
Changing Your Primary Monitor
While the default assignment of the primary monitor is typically automated, you have the flexibility to alter this configuration manually. The process for changing your primary monitor varies depending on the type of computer in use. Let’s look at the Windows 11 change display shortcut:
- Go to Settings
To start, go to your settings menu. You can do this by clicking on the Start menu, which is the Windows icon in the bottom-left corner of your screen. Then, click on the gear icon to open Settings.
Or you can also locate the search icon adjacent to it. You can directly input “Change primary display ” by clicking on this icon. This Windows shortcut change primary monitor will direct you to the relevant settings page, bypassing the need to navigate various menus.
- Access the “Multiple Monitors” Option
Next in line, click on the “Multiple Monitors” setting. Remember that this option might appear greyed out if your computer cannot detect the monitor you intend to designate as the new primary display.
Should you encounter difficulties with your PC’s ability to identify the intended monitor, a troubleshooting process will be necessary to rectify the issue.
Troubleshooting
Encountering issues with your multi-monitor setup? Here’s a concise troubleshooting guide:
- Check Connections: Ensure monitors are connected to the graphics card, not the motherboard.
- Cable Adjustment: Switch cables to the GPU if needed. Consider USB-C or Display Port cables.
- Quick Settings: Press Windows Key + P to adjust monitor settings. Ensure it’s not set to display one screen only.
- Try Another Cable: Sometimes, a different cable can solve the problem.
- Update Drivers: Update graphics card and onboard card drivers. Use software like GeForce Experience for NVIDIA or AMD’s software.
- Adjusting Primary Monitor and Display Arrangement
Inside the menu, you’ll see a visual representation of your connected monitors, complete with approximate display size and their spatial arrangement. This representation corresponds to how you’ll navigate your cursor between the monitors. You can rearrange these icons if your monitor positions change, but the main purpose here is to:
Select the icon representing the monitor you wish to designate as the primary display. From this point onward, most applications and content will typically open on this screen by default.
Monitor Disconnection Experience in Windows 11
Windows 11 has a useful feature that keeps the positions of program windows even if you disconnect your monitor. This is useful for laptop users who switch between various setups, such as docking stations and wired connections. With this feature, returning to your previous setup becomes seamless. You no longer have to endure the frustration of reorganizing your desktop layout due to Windows seemingly shuffling your windows like a game of 52-card pick-up.
Conclusion
Configuring multiple displays and setting a primary monitor can be daunting at first, but it’s actually pretty easy. However, don’t worry, as the elucidation provided within this article serves as your guiding light. Elevate your multitasking prowess both in the home and office settings with the ingenious assistance of SmartWindows. Seamlessly accommodating up to 6 displays, SmartWindows revolutionizes multi-monitor support, enhancing your productivity across many screens.
SmartWindows
Restore Browser Tabs with SmartWindows. It maintains an active tab history and restores browser size as well as display position on one screen or many.
FAQs
How do I change the main monitor in Windows 11?
To designate a monitor as your primary display, click on its corresponding number in the section above the “Multiple Displays” option. Customize your display by changing the wallpaper or screensaver, adding widgets, and selecting your monitor as the main display for the best viewing experience. For added convenience, Windows 11 allows you to retain your open windows’ positions by clicking on the “Remember window locations based on monitor connection” button.
How to shift a window from one monitor to the other?
Should a window materialize on the incorrect monitor within your multi-display setup, rectifying the situation is a breeze. By employing the Windows Key + Shift + Left/Right Arrow Key shortcut keys, you can smoothly navigate the window to the desired monitor. Use the left arrow key to shift it to the previous display or the right arrow key to relocate it to the subsequent one.
How do I change my primary monitor fast?
Customizing your primary display is a simple process. To customize your display, simply right-click on your desktop and choose “Display settings.” Once there, click on the box corresponding to the numbered display you intend to set as your main. Scroll to the bottom of the page and tick the checkbox labeled “Make this my main display.” Click the top-right X to finalize changes.