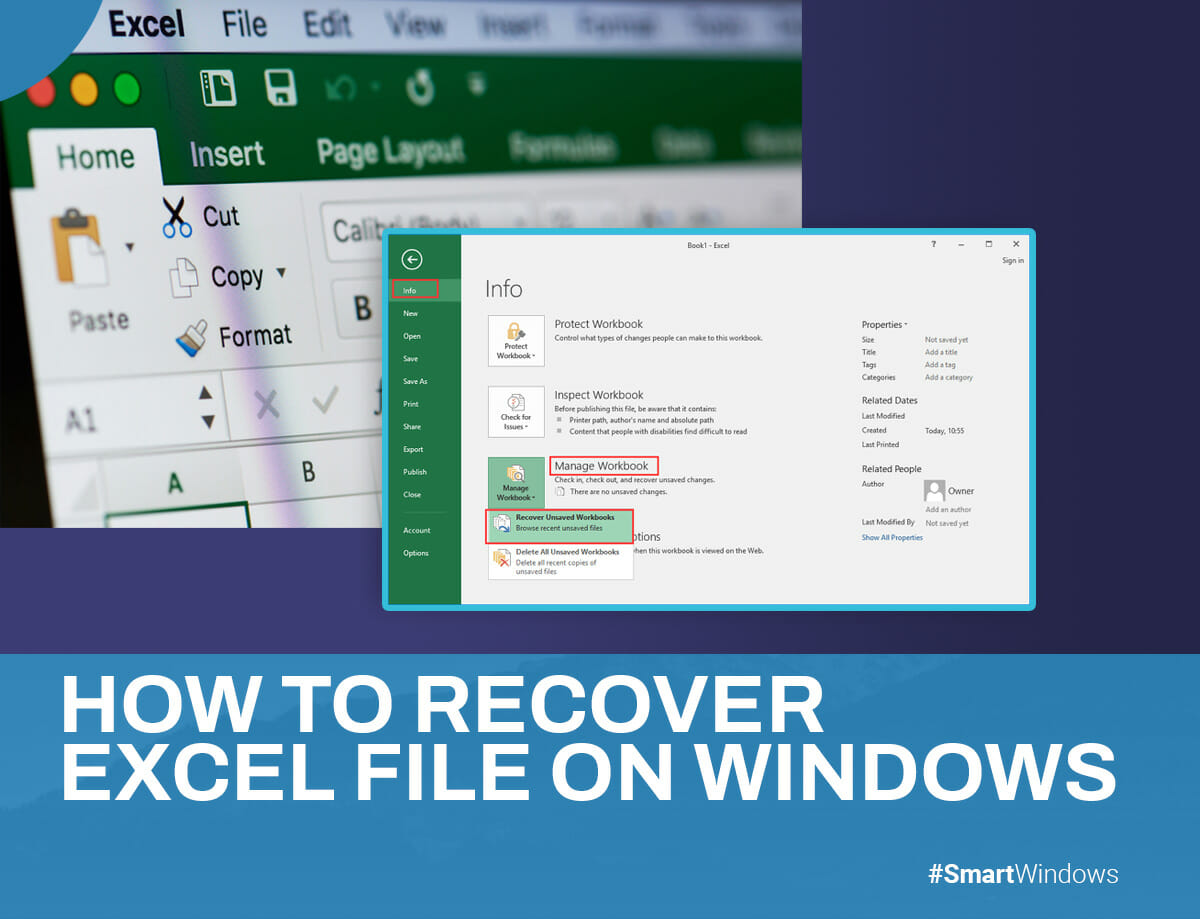
How to Recover Excel File on Windows – Useful Guide

Excel sheets have become integral to our lives, finding applications in various personal and professional spheres and housing valuable data that demands the utmost care. Accidents do occur, and the inadvertent deletion of an important Excel file can be distressing. But no worries, we’ve covered you with a guide on how to recover unsaved Excel files on Windows with no less than four foolproof methods. So, let’s get into it!

Efficient Ways to Recover Excel File on Windows

To find a deleted Excel file on Windows, make sure to look in all possible locations where it could have been saved by mistake. Perform a thorough search on your computer to ensure it’s not misplaced. If you confirm the missing file, follow these methods to retrieve it successfully.

  1. Restore Deleted Excel Files from the Recycle Bin

To recover a deleted Excel file on your Windows computer, open the Recycle Bin. Here’s how to do it.

To restore Excel files from the Recycle Bin:

  • Open the Recycle Bin.
  • Select the Excel files you want to restore.
  • Right-click on the selected files and select “Restore.”
  • The files will be restored to their original locations. You can also drag them to another folder or the desktop if needed.
  1. Recovering Deleted Excel Files with Previous Versions

For users who prefer specific versions of an Excel document during the editing process, the “Previous Versions” feature comes to the rescue. If File History is enabled in Windows 8 and above, you can browse and select needed file versions over time.

Ensure you have manually enabled File History in Control Panel > System and Security or activated System Restore Point; otherwise, this method won’t work. The feature can also be used to restore missing folders in Windows. Here’s how to recover unsaved excel files:

  • Open Windows File Explorer with “Windows + E” and find the folder with your Excel files before they disappear.
  • Right-click on the folder 
  • Select “Properties.”
  • Choose the desired file version you wish to retrieve, then click “Restore.”
  1. Check the History 

File History is your diligent protector, continuously backing up files in essential folders like Desktop, Documents, Pictures, Music, Videos, and even offline OneDrive files. These backups securely reside on an external storage device or a network drive, ensuring you can easily retrieve lost Excel files. Follow these simple steps to turn on File History:

  • Type “Backup settings” in the Windows search bar and click “Open.”
  • Under “Backup using File History,” select “Add a drive.”
  • Pick the external drive that will store your precious backups.
  1. Search for Autosaved and Temporary Files

Before giving up hope, let’s explore two secret vaults on your Windows computer where your unsaved or accidentally unrecorded Excel files might have taken refuge.

Autosaved Files

If the AutoRecover feature is enabled in Excel, you may be able to recover lost files from the AutoRecover folder. Follow these steps to unveil its name:

  • Click on “File” in Excel and then choose “Options.”
  • In the left-side menu, click “Save” to reveal how your Excel workbooks are saved.
  • The AutoRecover file location will unveil the secret lair of AutoRecovered files. Browse this folder and search for your missing file. 

Temporary Files

  • Access the Start menu and enter “%temp%” in the search field.
  • To open the folder and explore its hidden contents, please press the Enter key.
  • Scan for files with .xls or .xlsx extensions; beware, they might have nondescript filenames.

How to Recover Corrupted Excel Files

Encountering a corrupted Excel file can be distressing, but fear not, as you can try a manual recovery method. Follow these steps to retrieve your valuable data:

  • Launch Microsoft Excel and then click on the “Open Other Workbooks” option.
  • Navigate to “Computer/This PC” and select “Browse” to find the corrupted Excel file you wish to recover.
  • Click “Open” and then choose “Open and Repair.”
  • Click “Repair” to salvage as much data as possible from the corrupted file. If Repair is not effective, extract data instead.

How SmartWindows Can Help Recover Your Excel Files on Windows

Experience the unparalleled power of SmartWindows, an advanced software meticulously engineered to restore lost Excel files on Windows. With its cutting-edge capabilities, SmartWindows goes beyond conventional data recovery tools, adeptly retrieving files deleted from a range of local storage devices, including internal drives, external drives, and USB devices, which are otherwise unrecoverable from the Recycle Bin.

Facing the unfortunate scenario of a missing Excel file on your Windows system? Don’t worry, as SmartWindows stands as your reliable savior. Browse to seamlessly download the software and embark on a smooth recovery journey, guided by intuitive instructions at every step.

SmartWindows

Restore Browser Tabs with SmartWindows. It maintains an active tab history and restores browser size as well as display position on one screen or many.

FAQs

How do I recover a deleted Excel file without software?

You can recover deleted Excel files without third-party software by restoring from a previous backup. Follow these steps, provided Windows Backup functionality is enabled:

  • Locate the folder where the Excel file was stored. Right-click on it and choose “Properties.”
  • Open the “Previous Version” tab to see the list of previously stored Excel file versions.
  • Select the right version and click “Restore” to retrieve your document.

Why can’t I find my Excel file?

Encountering the “Can’t Find Files” error in Excel can stem from various factors, and one prevalent cause is when the file you’re attempting to open has been relocated or deleted. This situation often occurs if you’ve renamed the file, transferred it to another folder, or unintentionally deleted it.

What is the recovery file type for Excel?

The recovery file type for Excel is not “.xar“. The standard file extensions for Excel files are “.xlsx” for newer versions and “.xls” for older versions. Excel creates temporary backup copies with the “.xlk” extension when the AutoSave feature is enabled to protect data in case of unexpected application malfunctions or closures.

How do I turn on auto recovery in Excel?

To enable AutoRecovery in Excel:

  • Go to File > Options > Save.
  • Check “Save AutoRecover information every x minutes.”
  • Check “Keep the last auto recovered version if I close without saving.”
How to Optimize Windows 11 for Gaming – Useful Tips

Microsoft proudly asserts that Windows 11 reigns as the ultimate operating system for PC gaming. However, even ardent gamers occasionally beg to differ.

While Windows 11 eagerly strides towards becoming the next ubiquitous Windows OS, a handful of areas demand refinement, particularly in gaming. For example, many gamers have raised concerns about challenges like lackluster FPS (frames per second), frustrating lags, and unforeseen crashes. But don’t worry! In this article, we’ll see how to optimize Windows 11 for gaming. So, let’s get started!

Turn On Gaming Mode

Game Mode possesses the potential to revolutionize your gaming performance, unlocking a new level of excellence. By harnessing this feature, a cascade of benefits is set into motion. Game Mode dynamically reallocates precious system resources, channeling them towards gaming applications. In this harmonious state, distractions fade, and extra background activities are gracefully curtailed. Prepare for an immersive gaming experience where every moment is optimized for sheer enjoyment.

To enable Game Mode on Windows 11 and explore alternative gaming enhancements:

  • Open Settings (Windows key + S, search for “settings”).
  • Select Gaming, then Game mode.
  • Slide the toggle switch to On.

If Game Mode isn’t sufficient:

  • Consider using third-party tools like Razer Cortex.
  • Refer to our guide on boosting frame rate without a new GPU for additional tips.

Disable the “Enhance Pointer Precision” Option

One crucial step to optimize your gaming experience on Windows 11 is turning off the Enhance Pointer Precision option, a form of mouse acceleration imposed by default. This feature alters the cursor’s movement speed based on the velocity of your mouse movements, which can prove detrimental in gaming scenarios where precise and swift cursor control is paramount. Let’s embark on the journey of disabling this option to unlock your mouse’s true potential:

  1. Access the Control Panel by pressing the Windows key + S and searching for “Control Panel.”
  2. Choose “Hardware and Sound” and proceed to select “Mouse” from the “Devices and Printers” section.
  3. Go to the “Pointer Options” tab and deselect the checkbox next to “Enhance pointer precision.”

Pause Automatic Windows Updates

While it’s generally not recommended to disable automatic updates in Windows, there are ways to temporarily pause them without resorting to registry hacks. Microsoft offers a valuable feature that allows you to temporarily pause automatic updates, providing a useful way to prevent interruptions during gaming sessions.

To pause automatic updates in Windows, follow these steps:

  • Begin by opening the Settings screen. You can do this by pressing the Windows key and S simultaneously to initiate a search, then type “Settings” and select it from the results.
  • Click “Windows Update” in the Settings menu in the left menu.
  • In the Windows Update settings, select the “More options” section.
  • Within the “More options” section, you will find the option to “Pause updates.” Click on it to temporarily halt automatic updates.

Update the Windows 

Regularly updating your Windows 11 OS is crucial, just like updating your GPU drivers, to ensure optimal performance and functionality on your PC. Check for any pending OS updates before installing games and applications on your PC. These usually come with performance and user experience improvements.

  • Read the guide on how to install Windows 11 updates for instructions if needed.
  • Remember that Windows won’t automatically update on metered connections, so check for updates periodically if you’re on one.

Change the DNS

To change DNS settings on Windows 11 for improved online gaming:

  • Press Win + I keys to open Settings.
  • Click on “Network & Internet” in the left pane.
  • Select “Properties”.
  • Next to DNS server assignment, choose “Edit”.
  • Select “Manual” from the drop-down menu.
  • Turn on the IPv4 toggle switch.
  • Enter the desired DNS entries.
  • Click “Save”.
  • Restart your browser to apply the changes and enjoy an enhanced online gaming session.

Enhance Your Gaming Experience with SmartWindows

SmartWindows is a must-have productivity app for gamers, enabling efficient management of gaming and work setups on a single PC. Create unlimited profiles and displays for work, study, and entertainment. 

Effortlessly switch between configurations with the ability to save and restore profiles. SmartWindows optimizes your PC setup, ensuring seamless transitions between gaming and work environments and enhancing productivity and gaming experience.

SmartWindows

Restore Browser Tabs with SmartWindows. It maintains an active tab history and restores browser size as well as display position on one screen or many.

FAQs

Is Windows 11 optimized for gaming yet?

Windows 11 achieves slightly higher scores overall. However, when specifically evaluating frames per second (FPS) performance during gameplay, Windows 11 may occasionally yield slightly lower results. It’s worth noting that Windows 11 demonstrates improved FPS performance in certain games compared to other operating systems.

How do I optimize Windows 11 defender for gaming performance?

Optimize Windows 11 for gaming by:

  • Disabling “Memory integrity” in Windows Security.
  • Disabling “Virtual Machine Platform” in Windows Features.
  • Remember to re-enable these features for security after gaming.

How do I optimize my PC for gaming?

  • Keep your graphic drivers up to date.
  • Minimize background apps to free up system resources.
  • Ensure game mode is activated for the optimal gaming experience.
  • Fine-tune your mouse settings for precise control.
  • Adjust your monitor refresh rate for smoother visuals.
  • Turn off Nagle’s algorithm to reduce network latency.
  • Utilize faster DNS servers for improved online gaming.
  • Consider using OMEN Gaming Hub for additional optimization features.

How To Develop Your Multitasking Skills – Useful Tips

The demand for individuals who can seamlessly juggle multiple responsibilities has become increasingly prevalent in today’s fast-paced professional world. This art of multitasking, the ability to handle various tasks concurrently, has proven to be a coveted skill across numerous industries. Mastering multitasking boosts productivity, opens career opportunities, and propels promotions.

Are you eager to embrace a new approach and delve into multitasking? Let’s see how to multitask effectively at work. So, let’s get started!

What is Multitasking?

Multitasking skills can handle multiple responsibilities simultaneously. This entails concentrating on one task while maintaining awareness of others. For example, managing phone calls in a bustling reception area while welcoming visitors or responding to emails demonstrates proficient multitasking skills.

How To Develop Multitasking Skills

Let’s see how to multitask and stay organized at the same time: 

Establish Achievable Goals 

Setting realistic goals is crucial to your ability to handle multiple tasks simultaneously. By setting attainable objectives and creating an action plan, you set yourself up for success. Breaking down your goals and establishing a solid plan makes the process more manageable. As you start crossing off tasks from your to-do list, the sense of achievement will fuel your motivation to keep working towards completing the remaining tasks.

Prioritize the Tasks

When you have a list of tasks to tackle, it’s essential to prioritize them effectively. Here’s a helpful framework for categorizing your tasks:

Urgent and Essential Tasks

These tasks take precedence and should be completed first. They often involve time-sensitive matters like addressing customer inquiries, meeting project deadlines, or fulfilling critical requests from your superiors.

Important but Non-Urgent Tasks

These tasks hold significance but may not have immediate deadlines. They contribute value to your work in the long run, such as strategic planning, networking to expand business connections, or engaging in professional development activities.

Urgent but Less Important Tasks

Tasks in this category have a sense of urgency but bear less significance in the grand scheme. Consider completing them swiftly to clear the way for more important responsibilities. If possible, delegate such tasks to team members if you have the authority.

Work on Similar Tasks

Engaging in related activities can improve your ability to balance multiple responsibilities simultaneously.

Furthermore, when tasks share similarities in duties or requirements, working on them concurrently can increase overall efficiency. To develop your multitasking abilities, start tackling two related tasks and gradually increase the complexity as you become more proficient. For instance, SEO marketers can work on optimizing two client websites simultaneously as a starting point.

Minimize Distractions

A crucial aspect of improving your multitasking skills is eliminating distractions while you work. Minimizing external disruptions allows you to focus better and devote your full attention to the tasks. Distractions often hinder effective multitasking and contribute to loss of focus.

To optimize your work environment, consider removing any objects or items that may divert your attention, such as toys, unnecessary equipment, or distracting clocks. A helpful strategy is to log out of or close social media accounts (unless it is part of your job) to reduce online distractions. If you frequently check your phone out of habit, consider turning it off or placing it out of reach during your multitasking sessions.

Maintain a Consistent Work Tempo

Maintaining a steady pace is a valuable approach to effective multitasking. When handling multiple tasks, rushing can compromise work quality.

Rushing compromises accuracy and attention to detail, leading to mistakes and a decrease in the overall quality of your output. Consequently, you may need to redo the work, nullifying the time saved from rushing. Maintaining a steady pace allows for attention to detail and ensures work quality.

Take Regular Breaks

Taking regular breaks helps prevent a decline in motivation and guards against burnout. Working continuously without breaks can be counterproductive as it can decrease the quality of your work.

By scheduling short breaks throughout the day and honoring them, you allow yourself time to unwind and step away from your desk. Consider setting reminders in your calendar to prompt you to take these breaks. Stepping away from your work, even briefly, allows you to recharge and return to your tasks with a refreshed perspective.

Breaks prevent fatigue and burnout and offer a chance to spot overlooked errors and areas for improvement. You can maintain focus and optimize your multitasking abilities by giving yourself time to rest and rejuvenate.

Boost Productivity with Music

Practicing working with music is an excellent method to enhance your multitasking skills. This approach helps train your brain to handle multiple tasks simultaneously and effectively switch between different activities.

Listening to music while completing a simple activity can improve your multitasking ability and adapt to switching between tasks. It trains your brain to navigate different stimuli and focus on multiple activities simultaneously.

The impact of music on multitasking can vary based on individual abilities and preferences. Some individuals may find working with music distracting and hindering their ability to concentrate effectively. If you find music to be a hindrance, it’s best to disregard this particular step and explore other strategies mentioned earlier.

Conclusion 

Discovering the art of multitasking can be a game-changer. Prioritize tasks, eliminate distractions, take breaks, and even practice with music. Mastering multitasking means doing more with focus and quality. Do you know what can help you with your multitasking skills? SmartWindows

SmartWindows is the ultimate multitasking tool streamlining your desktop experience, making it easier to handle multiple tasks simultaneously. You can seamlessly switch between different projects with a single click by organizing your display and app positioning. 

Whether working with multiple browsers, managing Microsoft Office files, or using multiple monitors, SmartWindows has you covered. Its ability to create separate profiles for work and entertainment ensures a smooth transition between different contexts. With SmartWindows, multitasking becomes effortless, empowering you to easily conquer your workload.

SmartWindows

Restore Browser Tabs with SmartWindows. It maintains an active tab history and restores browser size as well as display position on one screen or many.

What is the Easiest Operating System to Use – Explained

An operating system (OS) is like your computer’s brain. It manages everything behind the scenes, connecting the physical parts to your programs. The OS makes your computer simple to use by providing a user-friendly interface. It’s like having a friendly guide showing you the way. The OS manages tasks, resolves issues, and completes requests. It’s a multitasking pro!

An operating system is necessary for the basic functioning of a computer. It wouldn’t know how to run the cool apps and programs you love. In this article, we’ll discuss the easiest operating systems! So, let’s get started! 

Windows 

Windows is one of the best operating system for laptop Boasting a wide distribution, Windows OS comes preinstalled on numerous computer systems, making it readily available to users. Its reputation as the finest operating system for desktop computers and laptops stems from its remarkable unity, impressive functionality, enhanced productivity, reliable support, and various system utilities.

Windows OS is like having a virtual chameleon that adapts effortlessly to your desired use. Windows incorporates many recognizable operating systems features to bolster security, efficiency, and privacy. It’s as if a digital fortress is guarding your valuable data. Its intuitive nature makes navigating and utilizing the OS a walk in the park.

Features

  • Robust User Interface with easy navigation
  • Start menu on the left side listing options and applications
  • Task View feature for switching between multiple workspaces
  • Two separate user interfaces for mouse/keyboard and touchscreen (Tablet Mode)
  • Multifactor authentication technology for higher security (BIN, PIN, Fingerprint recognition, etc.)
  • Automatic compression of system files to reduce storage footprint
  • Lightning speed operation
  • Protection against potential threats

SmartWindows is a powerful tool that enhances your Windows operating system by simplifying its usage. With features like efficient desktop organization, preset display arrangements, multi-browser support, Microsoft Office file compatibility, multi-monitor capabilities, separate work and entertainment profiles, and multi-user functionality, SmartWindows offers a seamless and customized user experience. It optimizes your desktop display, improves productivity, and allows smooth multitasking.

macOS

macOS, the operating software system exclusive to Apple Macintosh computers, is renowned for its unmatched reliability and user-friendly interface. It’s an easy platform that offers stability, making it a favorite among users. Exploring macOS is a breeze, thanks to its seamless functionality. Apple ensures excellent support, constantly refining and upgrading the OS to enhance security and optimize performance.

What sets macOS apart is its commitment to stringent testing before integrating apps into the system. This meticulous approach ensures that only well-performing and high-quality applications make their way to the users, resulting in a smooth and efficient experience.

Features

  • Dynamic desktop for sorting files by tag, type, or date
  • Dark mode to protect your eyes
  • App Store with over 2 million heavily scanned applications before the release
  • Anonymous online profile to prevent website tracking
  • Apple Music allows search by lyrics
  • iCloud for easy storage of images and documents across multiple devices
  • Excellent support and constant refinement
  • Commitment to stringent testing for integrated apps
  • Regular updates for security enhancement

Android

Google and the Open Handset Alliance created Android for mobile devices. Its open-source nature enables a wide range of app availability and customization options, making it highly favored among smartphone manufacturers. Android allows you to create and customize your interface, making your device unique. 

It has over 2,000,000 apps; you’ll always have options. Whether it’s productivity tools, entertainment apps, or utility applications, the Android ecosystem offers diverse choices to cater to your needs and interests. These apps load and process swiftly, ensuring a smooth and efficient user experience.

Android OS is used in many devices, not just smartphones. It’s in smartwatches, PCs, cars, TVs, cameras, game consoles, and tablets. Android is a flexible and adaptable platform manufacturers use to add smart product features.

Features

  • Highly customizable user interface
  • Support for connectivity options: 3G, 4G, 5G, Bluetooth, CDMA, GSM, Hotspot, NFC, USB, VOLTE, VPN, and WiFi
  • Ability to run multiple services and apps in the background
  • Support for multiple languages, including Chinese, Dutch, English, French, German, Hindi, Japanese, and Russian

Elementary OS

Elementary OS is an easy operating system that is based on Ubuntu. The operating system was announced in July 2011 and released on May 29, 2012, to deliver a seamless and visually appealing computer experience. Unlike other operating systems or distributions, Elementary OS was built entirely from scratch, emphasizing design and elegance. This focus ensures users enjoy the best possible experience on their computers or laptops.

One of the standout features of types of operating system is its desktop environment, known as Pantheon, which bears similarities to the macOS interface. This similarity has earned Elementary OS the “macOS of the Linux world.” The Pantheon desktop environment combines a clean and intuitive design with user-friendly features, providing users with a familiar and enjoyable interface.

Features

  • Modern and clean user interface
  • Designed for accessibility and ease of use
  • Pre-installed applications
  • Renowned for reliability and stability
  • Regular security patches and updates

Conclusion

Choosing the right operating system is important. This latest release incorporates numerous updated features and advancements aimed at enhancing the overall user experience. The preferred OS should exhibit reliability while offering flexibility to accommodate future growth. Picking an operating system can be challenging because there are lots of choices. The user interface should be easy for regular users and IT administrators. It depends on what the business needs and what the person likes. However, by closely aligning with the organization’s needs, customers can make informed decisions that lead to the right choice of the operating system.

SmartWindows

Restore Browser Tabs with SmartWindows. It maintains an active tab history and restores browser size as well as display position on one screen or many.

FAQs

What OS is most commonly used?

It’s Microsoft Windows. Microsoft’s Windows is the world’s most widely used computer operating system, commanding a staggering 70.39% share of the desktop, tablet, and console OS market as of January 2023.

What is the next generation operating system?

Windows 11 marks Microsoft’s long-awaited “next generation” operating system, arriving after a six-year gap. This new release brings many updated features and advancements to enhance the user experience.

What are the 3 most used OS?

The 3 primary operating systems are:

  • Microsoft Windows
  • macOS
  • Linux

How to Recover Unsaved Word Document – Solved

Losing a document you’ve given your time and effort can be devastating. We’ve all been there! Imagine diligently working on a Word document, giving it your all, only to see it disappear completely. It feels terrible when all the effort you put into your Word document suddenly disappears.

But don’t worry! Even! If you find yourself in such a situation, there’s still hope. You can recover unsaved Word documents regardless of the version you’re using or whether you’re on a Mac. You read that right; your precious work might not be lost forever!

And it’s not just about accidental deletions either. We’ll also cover how to retrieve that mistakenly trashed Word document from the Recycle Bin or, if all else fails, turn to data recovery programs for a helping hand. Want to know how to recover unsaved Word document? So, let’s get started! 

Recovering Unsaved Word Documents

Losing an unsaved Word document can be a major setback, whether using Word for personal or business purposes. Experiencing the frustration of losing your work due to an unexpected crash is a familiar and disheartening situation. While some users habitually save their documents frequently, many do not.

Fortunately, even if your system crashes and you find yourself with an unsaved document, various options are available to recover your precious work. Let’s explore ways to retrieve unsaved files, ensuring your efforts are not wasted.

Temporary Files

Discover the world of temporary files and uncover the possibility of finding your unsaved document amidst these hidden gems.

AutoRecover Files

Learn how to leverage the AutoRecover feature to retrieve your unsaved Word documents and safeguard your work against unforeseen crashes.

Document Recovery

Explore the built-in Document Recovery option, which serves as a lifeline for retrieving unsaved documents and getting you back on track.

Recycle Bin

Don’t overlook the Recycle Bin! Find out how to recover your unsaved Word documents from this often-forgotten treasure trove.

Data Recovery Solutions

In dire situations where everything fails, discover powerful data recovery solutions that can help you retrieve your unsaved Word documents, no matter the circumstances.

Does Word Create Backup Files?

Similar to many software programs of its kind, Microsoft Word incorporates an automatic “auto-save” feature that regularly creates backup copies of your work. Usually, the backup files are saved in the AppData folder as a standard setting.

Here are a few paths you can explore to locate backup copies of your files:

C:\Users\Your_Username\AppData\Local\Microsoft\Word

Or

C:\Users\Your_Username\AppData\Local\Temp

Or

C:\Users\Your_Username\AppData\Local\Microsoft\Office\UnsavedFiles

Backup files in Word have the file extension “.wbk“. Unless you have disabled the backup option, Word will generate these copies of your documents at regular intervals.

To confirm whether the backup option is enabled, follow these steps:

  • Go to the “File” tab.
  • Select “Options”.
  • Choose “Advanced” in the options window.
  • Scroll down to the “Save” section.
  • Ensure that the checkbox next to “Always create backup copy” is selected.

Does Word Offer Cloud Saving Capabilities? 

Absolutely! Word allows you to save your documents to the cloud, specifically OneDrive.

Storing documents in the cloud brings numerous advantages, including simplified sharing and enhanced collaboration. It also allows seamless access from various devices such as PCs, laptops, smartphones, or tablets, ensuring convenient mobility and bolstered data protection.

Let’s see how you can save files to the cloud: 

  • Click on the “File” menu and select “Save As”.
  • Choose “OneDrive” as the storage option.
  • Provide a descriptive file name.
  • Click on “Save”.

Safeguard your personal and payment information in your personal OneDrive account. Or, you can select another location from the provided list or even “Add a Place” of your preference.

You can upload backup files to the Acronis cloud using a third-party backup solution like Acronis Cyber Protect Home Office. By utilizing a dedicated cloud backup service, you gain the benefits of backup encryption, automated backups, and reliable data recovery processes, thus enhancing your cybersecurity measures.

How Can You Recover a Permanently Deleted File?

Accidentally deleting important files can be distressing, but there are potential solutions to recover them. Here’s how to recover unsaved Word document on laptop.

Use File History or Previous Versions 

If you have enabled File History or created previous versions of your files, you can access older versions and restore the deleted file. Click on its location, select “Properties”, and go to the “Previous Versions” tab to restore the file.

Use File Recovery Software 

Various file recovery software programs can help you recover permanently deleted files. Discover powerful tools designed to recover deleted files from your storage devices. These software solutions, including Recuva, EaseUS Data Recovery Wizard, and Disk Drill, can effectively scan your devices and provide an opportunity to retrieve lost data.

Recovering Deleted Word Documents from Trash Bin

When you delete files on your Mac, they are moved to the Trash Bin. They remain there until you choose to empty the Trash. The following are the steps to recover deleted Word documents:

  • Find and click the Trash Bin icon in the lower-left corner of your screen.
  • Right-click the file and choose “Put Back”. It will be restored to its original location.

Recovering Deleted Word Documents from Backup

Regularly backing up your Mac’s data is a recommended practice. If you have a backup created by Time Machine that predates the deletion of your Word document, you can restore it. Here’s how:

  • Connect the Time Machine backup storage device to your computer.
  • Open Finder and locate the folder with the lost Word document.
  • Launch Time Machine by clicking its icon in the menu bar.
  • Use the timeline and arrows to browse through the backups and snapshots.
  • Select the specific Word document you wish to restore, and click the “Restore” button. 

Recovering Deleted Word Documents with SmartWindows

SmartWindows automatically restore a wide range of Microsoft Office files, encompassing Word, PowerPoint, Excel, Project, Notepad, and Wordpad. If you’ve ever experienced the frustration of losing unsaved work due to a power outage, system crash, or accidental closure of your Word document, SmartWindows can be a lifesaver. 

By leveraging advanced recovery algorithms and intelligent file management, SmartWindows ensures that your unsaved Word documents are promptly recovered and made available for retrieval. Let’s explore how you can use SmartWindows to recover your Word file.

  • Download SmartWindows software.
  • Open SmartWindows from the bottom left corner.
  • Select “Restore Profile”.
  • Click on “Microsoft File”.

Tips to Protect Your Important Word Files from Loss

Losing important Word files can be a frustrating experience. Consider implementing the following tips to prevent such setbacks and protect your valuable documents. By taking proactive measures, you can avoid the stress of data loss and ensure the safety of your important files.

Review Before Deleting

Before permanently deleting files by emptying the Trash, pause and review the items you will discard. Often, you can retrieve mistakenly deleted files from the Trash itself, saving you the trouble of using data recovery software after it’s emptied.

Install Reliable Anti-Virus Software

Installing a trusted and up-to-date anti-virus program protects from malware and viruses that can lead to data loss. Stay vigilant with the best data security practices to shield your Word files from potential threats.

Use a Surge Protector

Protect your system against unforeseen crashes and data loss resulting from power surges or spikes. Investing in a reliable surge protector safeguards against losing your valuable Word documents due to unforeseen electrical fluctuations.

Activate AutoRecovery

Take advantage of Microsoft’s AutoRecovery feature, an invaluable tool for protecting your Word documents. Refer to Microsoft’s documentation on enabling and utilizing AutoRecovery effectively. This will automatically protect and recover your files.

Maintain Diversified Backups

To reduce the data loss risk, maintain multiple Word file backups. Save your documents regularly and create backups on different devices. Use external drives, cloud storage solutions, and other options to ensure your files are safely stored and easily recoverable.

Conclusion 

Sometimes, despite taking precautions, unexpected crashes or system errors can lead to losing your Word files. While it’s crucial to protect your files proactively, data loss can still occur unexpectedly. In such unfortunate situations, you have several data recovery methods. One simple solution is to store your documents in the cloud. Or use reliable recovery software like SmartWindows to significantly increase the chances of retrieving lost Word files.

SmartWindows

Restore Browser Tabs with SmartWindows. It maintains an active tab history and restores browser size as well as display position on one screen or many.

FAQs

How do I recover an unsaved Word document Windows 10?

  • Access the File tab, navigate to Info, and proceed to Manage Documents.
  • Locate and select “Recover Unsaved Documents” from the dropdown menu within the provided options.
  • Once you have identified the document you wish to recover, click the Open button.
  • To protect your recovered Word document, click the Save As button and save it in your desired location.

How to recover unsaved Word document 2016?

  • Review recent document history.
  • Access temporary files.
  • Utilize the AutoRecover feature.

Where are temporary Word files stored?

When Word performs an automatic save, it creates a temporary file as a safety net. This temporary file is usually stored in the Temp folder. However, if a valid Temp folder is not present, Word cleverly saves the temporary file in the same location where it saves the document.

SmartWindows takes Browser Tabs to the Next Level

Browser tabs

On average, how many tabs do you open on your browser while working?
If more than a dozen, you probably face some major issues when it comes to managing or reopening the tabs every time you start the work. Most of the time, browsers are overflowing with a large number of tabs when we are doing some extensive research work with multiple web apps. The browser tabs get out of control and ultimately affect the performance of our computer.Save your time and effort of tabs restoration with SmartWindows on Windows 10 and Windows 11

Problems we Face with Browsers

There are some common problems we face with browsers on a regular basis. 

  1. While working on multiple tasks at the same time, a browser gets flooded with tabs related to your homework, research work, or multiple office projects. It becomes hard to figure out which tab belongs to what category and you keep on clicking across each tab to get the one you need.
  2. An accidental click on ‘X’ shuts down all the important tabs and you need to follow a number of steps in the browser’s settings to reopen the closed tabs.
  3. Masses of tabs opened in a single browser slow down the performance of your PC.
  4. When you are using multiple browsers it gets hard to switch between each other and even harder when multiple browsers shut down accidentally due to sudden power outages or automatic Windows updates.
  5. Browsers get cluttered with so many bookmarks, folders, email accounts, and other web apps of different tasks that it gets difficult to look up the one you need.
  6. When you have arranged the multiple browser windows by investing much time with dedicated tabs, optimized window size, and the display position on the screen, and repeat all every time you start your computer.

The browsers allow tabs to work independently, and this feature can be leveraged to empower the user to work with multiple browsers. The first browser with tabs works independently from the other that does not exchange any data or logins and thus, allows you to work in an efficient and secure manner.

How SmartWindows is a One-Stop Solution?

Technology has the solution to every problem. SmartWindows is one feature-rich productivity software that assists you with its automated capabilities for your browsers. Before diving deep into its features, see how SmartWindows works:

  1. Open the number of browsers on one or as many displays or profiles as you want.
  2. Open as many tabs on one or multiple browsers as you need.
  3. Arrange the browser windows on the display screen by resizing their window size or adjusting their display position.
  4. Create a profile on SmartWindows to save the configuration of the screen
  5. Click ‘restore’ and choose the profile you want to restore whenever you need it. SmartWindows will auto-restore all the tabs of multiple browsers with exactly the same window size and at the same display position, as you saved last time.

Multi-Browser Support

SmartWindows is all in one browser restoration software that gives support for all your favorite browsers. Whether it is Google Chrome, Firefox, or Microsoft Edge, it allows you to open multiple windows of one or many browsers on your computer screen. It provides you auto-restoration support and reopens the closed tabs of multiple browsers with just one click.

A cluttered monitor with so many tabs opened in one browser makes it hard to jump from tab to tab to find the right tab. Moreover, it uses up more memory and slows down the computer’s performance. One possible solution is to use multiple browsers and group the related tabs in new windows accordingly.

So, if you are working on multiple browsers, each dedicated to your homework, entertainment, or office work, you can restore all the browser tabs by clicking the ‘restore’ button on your SmartWindows profile. Eliminate the overhead of re-opening the tabs in each browser separately and get started on your work without any delay.

Multi-Tab Support

SmartWindows saves your profile configurations. It saves the browsers with their respective URLs and auto-restores the hundreds of tabs with a single click. Open tabs related to one task in a sequence to prevent the hassle. You do not need to manually open the tabs in your browser. SmartWindows maintains the active browser history and reopens the closed tabs with the same tab arrangements on your browsers.

Save your time and effort of tabs restoration with SmartWindows on Windows!

Auto-Arrange & Auto-Restoration

Once you have arranged the window size and display position of your browsers, you do not need to do it again and again. SmartWindows saves the configuration of your display screen and gives you auto-restoration capability that auto-arranges the browser windows the same way you arranged last time. 

SmartWindows increases your productivity at work with its auto-arrangement and auto-restoration features. The valuable time that you used to spend in the arrangement and reopening of browser tabs can be used to do high-priority and important tasks.

Multiple Profiles & Displays

SmartWindows allows you to create unlimited profiles and up to 6 displays. Its extensive support for multiple profiles and displays allows you to separate the work-life from personal and entertainment life. You can organize the desktop apps efficiently in each profile or display them according to your liking. Create customized presets and layouts of multiple browsers, save and restore them without wasting a single minute.

Optimized System Performance

Instead of creating a mess of tabs in one browser that affects the performance of your system, SmartWindows allows you to use multiple browsers on various profiles. We know that browsers consume so much of the processing power and memory of a PC. To overcome the lag, use multiple browsers on different profiles. Restore the browser tabs with their respective URLs on each profile with SmartWindows and get enhanced system performance.